Monday, February 20, 2012

English/Spanish Translator iPhone App

I recently searched through several English/Spanish iPhone translator apps, and found one that is revolutionary. Here is the basic stuff it can do:

  1. Type or speak a word/phrase and it will translate it to another language (works for 50+ languages)
  2. Push a button, and it will speak the translated phrase

But, what makes it revolutionary is the conversation mode feature. At first this seems like legendary SciFi stuff (very Star Trekkish), but really the app is just combining voice recognition technology, an online translation engine, and voice output to become a personal translation assistant you can carry in your pocket.

See the icon in the screenshot above. Click that to enter conversation mode. You can then click either speak a sentence in English or Spanish and it will use voice recognition software to figure out what you said, automatically translate that into the other language, then say it out loud in the other language … just like a real-life translator would.

Just How Good Is It?

Honestly … I don't know how accurate it is. My wife is certified to teach Spanish, and after looking at how it translated a few phrases she thought this app did a better job translating than most of the other apps I tried. At the end of the day, a machine will never be as good as translating a person who really knows and understands not only the language, but the local vernacular as well. My bet is the translation is rough at best, but would likely get the point across 90% of the time.

Which App Do I Get?

There are 2 iTranslate apps … a free one, and one that costs $1.99. You get the basic functionality with the free one, but if you want conversation mode you need to get the $1.99 one. The free one says you can use conversation mode if you want to pay per transaction … but there is a bug in the app, and it will just steal your money and never work (ask me how I know). To enable unlimited conversations in the $1.99 app they will make you pay an extra $0.99. So total it will cost you about $3. Of course it would be better to learn to speak the language yourself, but it seems like $3 can get you at least 1/2 way there with this revolutionary app.

Here is what the app icon looks like:
Change Voice, Dialect & Speed

You can customize the voice, dialect, & speed it uses to speak the phrase for each language. It might be weird for a trade partner if Kent was talking to a trade partner in the field, but when he said a sentence the app repeated it in a woman’s voice in Castilian Spanish (this is the Spanish someone would speak in Spain … but not in the U.S.). To customize these settings, click the icon in the bottom-right of the main screen, then select Voices, and select the language you want to change.

Helpful Links

Tuesday, February 14, 2012

Setting Free/Busy Status On Calendar Events

A few weeks ago I showed how to use Outlook's Scheduling Assistant feature. That feature is especially powerful when you need to schedule a meeting with multiple people, because it allows you to quickly find a time when everyone has a free spot on their calendar. But that system only really works if:

  1. Everyone keeps their schedule on their calendar (i.e. blocking out time when they aren't available)
  2. Everyone sets their free/busy status appropriately for events on their calendar (i.e. not blocking out time they really are available)

#1 is simple, but I wanted to quickly show explain #2 and show how to set the free/busy status for events on your calendar. You may sometimes have events on your calendar that aren't really meetings or even events you will personally attend. They might be personal reminders, or I know some managers keep track of their team's vacation schedule by getting them to send a calendar invite for the times they will be out so the manager has it on their calendar as a reminder. If you have events like this on your calendar, you need to ensure their free/busy status is set to Free. That will still keep it on your calendar, but it won't make it appear like you are blocked off during that time when other people are trying to look at when you would be free using Outlook's Scheduling Assistant.

Here is where you would set the free/busy status when you have a calendar event open in Outlook. They call that event setting Show As:

You can also set the free/busy status for a calendar event from your iPhone. They call that event setting Availability:

When you accept an invite from someone, by default the event will be set to busy when it is added to your calendar. So just remember to change it to Free if it really shouldn't block off your calendar.

Monday, February 6, 2012

iPhone Photography Tips

Here are some tips Rick mentioned recently that can help you snap great photos with your iPhone.

  • Where is the light? Be aware of where the sun or other major light sources (windows, indoor lighting, etc) are in your photo. You should always prefer them to be behind you shining onto the subject (watch your shadow), but it can also work to have the light coming in from the side. Avoid photos directly towards bright light. If the light is overwhelming, you can always tap on the focal point of photo and the phone will automatically adjust the lighting for that area.
  • Wings In, Steady Shot. To avoid blurry photos, hold the phone like you would a camera (2 handed) and tuck both your elbows in toward your body to help steady your shot. If you can rest the camera on a stable surface or brace your hands/arms on a stable surface ... even better.
  • Create interest. Most amateur photography is boring. Try to think of different ways you can compose the shot to add interest. Move around and get in different positions to find a unique perspective. You can also add interest by placing the subject off-center or only including a fragment of the subject to compose a shot of something familiar in an unfamiliar way.
  • Watch the edges. Pay attention to distracting clutter that may be lurking in the edges or background of your photo. It is easy to get so focused on the subject that you miss other things in the photo that can be distracting. After you snap the shot, look at it on your phone with fresh eyes ... trying to see what others would the first time they look at it, and paying special attention to the edges and whatever is directly behind the subject.
  • Use HDR in Low Light. Try the iPhone's HDR setting in low light instead of the flash. This essentially allows a greater range between the lightest and darkest areas of a photo (hence the name "High Dynamic Range"), which can help add more definition to photos with difficult lighting.

Here are a few other quick tips from some pros:

  • Zoom with your feet. Don’t zoom in with the zoom on the camera, zoom in with your feet. If you want a tighter photo, get closer. Photo quality plummets with just a tiny bit of zooming with images becoming grainy and pixilated.
  • Take multiple shots. The great thing about digital photography is it allows for a lot of attempts and a lot of mistakes. You can just take multiple shots of the same thing and inevitably one of them will be vastly better than the others.
  • Clean the lens. Because we use our phones all the time ... they can get filthy. Some protective iPhone cases tend to allow dirt to collect more than others. Wipe off the lens occasionally, because there isn't much you can do with a photo covered with dust.
  • Post Process. Most great photographers do some type of post-processing edits & touch ups on every single photo they take. You can correct a lot of common issues using a free, simple tool like Google's Picasa to adjust lighting, color temperature/saturation, sharpen a photo, crop out distracting elements, or apply a number of different effects to add interest.

Monday, January 30, 2012

How To Use Scheduling Assistant to Reserve Rooms

If you plan to have a meeting or event in one of our shared meeting spaces like the Main Conference Room or Garden Room, you need to reserve it on the calendar. This is especially important now that we are making those more available to outside organizations during business hours. Here are tips on how you can check the availability of one of those rooms, and how to properly reserve the space in a way that others would see it was in use during that time.

This is very important, because unless everyone schedules these shared resources in the way I about to explain we will inevitably have scheduling conflicts. So, if there are multiple people needing the same space … the new rule is, whoever had it properly reserved on the calendar gets the room. This will also ensure if an outside organization reserves the space, it will actually be available for them to use when they get here (I’m guess it might be awkward if it isn’t).

I am going to explain how to do this using Outlook Web Access, although the steps would be very similar in the Outlook desktop client.

  1. Open Outlook Web Access by going to mail.betenbough.com
  2. Click on the Calendar tab in the left navigation menu, then click the New link at the top.
  3. That should open a new window where you can enter the event details (shown below). Click on the Scheduling Assistant tab at the top.
    Important: You can’t just type in the room in the “Location” textbox for the event (shown above). That won’t add it on the shared calendar for that room, which means nobody else will be able to see that you plan to use that space during that time.
  4. In this window you can add both meeting attendees (at least for Betenbough Employees) and specify the Rooms you want to reserve. Just click on the line under Select Rooms, and you can start typing in the name of the room you want to reserve. It will auto-complete possible choices as you type. For this to work, you must type in one of these room names:
    • Main Conference Room - The big room where we have ownership meetings
    • Small Conference Room - The small room behind Peggy’s desk where we do closings
    • Garden Room - Yep … exactly what you think it is.
    • Break Room - This is the redesigned space for kids, but if you want to reserve it for a party or for something like worship team practice … you might pick this room.

    Ensure there is a check by the room you want to reserve. In the center on the window you can see the free/busy schedule for all attendees as well as any rooms you selected. Just click on an open timeslot on the schedule and it will automatically adjust the start & end times of the meeting:
  5. You can now switch back to the Appointment tab at that top and finish entering the rest of the details for the meeting/event (i.e. subject, when the reminder should go off, etc).
  6. Click the Send button in the top left corner, and you’re done. That will send an invite to the attendees and also send the calendar event to the shared calendar for the room.

Tuesday, January 24, 2012

Tips for Working with Shared Calendar Events

You may have noticed several calendar event emails from Kelly last week to delete the ownership meeting … no wait, add it back … no, delete it 2 more times … no wait, add it back. Very confusing Kelly!

This really wasn’t Kelly’s fault. We have noticed quirky behavior like this often occurs when you try to edit or delete a calendar event from your phone that is shared between multiple people. When you update an event on your phone, it tries to keep that in-sync with your Exchange calendar. This is a fundamental problem with the way the iPhone communicates changes to shared calendar events with our Exchange server. It simply doesn’t give it enough details for it to handle updates to shared calendar events the way you might expect it to.

In this example, Kelly triggered this quirky behavior when he updated the shared “Ownership Meeting” calendar event on his phone and then his iPhone tried to sync that with his Exchange calendar. It thought it needed to send out changes to that event to the rest of the people involved, which in this case was “All Employees”. I also believe the multiple update emails that were sent were also related to this confusion between the iPhone & the Exchange server.

Unfortunately, my team isn't able to fix this issue. It is something that either Apple or Microsoft will need to address, and we don't have a lot of pull with either. Considering there isn't a lot of love between those guys ... I'm not expecting a fix anytime soon.

So my recommendation is simple: Don’t edit or delete shared calendar events from your iPhone, but instead wait until you get back to your computer and edit those in Outlook. If you must edit a shared calendar event from your iPhone, you could alternatively go to mail.betenbough.com in Safari and use the web-based interface to edit your calendar events similar to how you would do it in Outlook. By following either approach you will be editing the event directly on our Exchange Server and not through the built-in Calendar app on your iPhone, which should bypass the issue completely.

This only applies to events that have multiple people involved (i.e. you sent or received an invite for that event). You can tell if it is one of these types of events if there are other people listed in the "Invitees" section when you view the Event Details on your iPhone.

Tuesday, January 3, 2012

Google Search Tips & Tricks

I have found one of the most useful skills an IT guy can have is the ability to find what we are looking for on the web very quickly. The key to that is being able to craft well-written Google queries. This seems like a skill that most people could benefit from, so I thought I would pass on some tips & tricks and quickly bring you up to black-belt status in navigating The Internets.

The Basics

  • Every word matters. Generally, all the words you put in the query will be used.
  • Search is never sensitive. A search for new york times is the same as a search for New York Times."
  • Generally, punctuation is ignored, including @#$%^&*()=+[]\ and other special characters.

Keyword Tips

  • Less is more - Simple, one or two word search terms will usually give you the broadest results. The goal of each word in a query is to focus it further. Since all words are used, each additional word limits the results. If you limit too much, you will miss a lot of useful information. The main advantage to starting with fewer keywords is that, if you don't get what you need, the results will likely give you a good indication of what additional words are needed to refine your results on the next search. For example, weather cancun is a simple way to find the weather and it is likely to give better results than the longer weather report for cancun mexico.
  • Use descriptive words - The more unique the word, the more likely you are to get relevant results. Words that are not very descriptive, like 'document,' 'website,' 'company,' or 'info,' are usually not needed. So celebrity ringtones is probably better than celebrity sounds.
  • Visualize what you’re looking for - Think how the page you are looking for will be written. A search engine is not a human, it is a program that matches the words you give to pages on the web. Use the words that are most likely to appear on the page. Keep in mind though, that even if the word has the correct meaning, if it's not the one most people use, it may not match the pages you need.

Search Operators

There are a handful of special characters or phrases you can add to your keywords that can provide some additional context or detail that will help Google find what you are looking for.

  • Terms you want to exclude (-) - Attaching a minus sign immediately before a word indicates that you do not want pages that contain this word to appear in your results. The minus sign should appear immediately before the word and should be preceded with a space. For example, in the query anti-virus software, the minus sign is used as a hyphen and will not be interpreted as an exclusion symbol; whereas the query anti-virus -software will search for the words 'anti-virus' but exclude references to software. You can exclude as many words as you want by using the - sign in front of all of them, for example jaguar -cars -football -os.
  • Fill in the blanks (*) - The *, or wildcard, is a little-known feature that can be very powerful. If you include * within a query, it tells Google to try to treat the star as a placeholder for any unknown term(s) and then find the best matches. For example, the search Google * will give you results about many of Google's products (go to next page and next page -- we have many products). The query Obama voted * on the * bill will give you stories about different votes on different bills. Note that the * operator works only on whole words, not parts of words.
  • Either Or (Or) - Google's default behavior is to consider all the words in a search. If you want to specifically allow either one of several words, you can use the OR operator (note that you have to type 'OR' in ALL CAPS). For example, San Francisco Giants 2004 OR 2005 will give you results about either one of these years, whereas San Francisco Giants 2004 2005 (without the OR) will show pages that include both years on the same page. The symbol | can be substituted for OR. (The AND operator, by the way, is the default, so it is not needed.)
  • Phrase search ("") - By putting double quotes around a set of words, you are telling Google to consider the exact words in that exact order without any change. Google already uses the order and the fact that the words are together as a very strong signal and will stray from it only for a good reason, so quotes are usually unnecessary. By insisting on phrase search you might be missing good results accidentally. For example, a search for "Alexander Bell" (with quotes) will miss the pages that refer to Alexander G. Bell.
  • Search single word exactly as is ("") - Google employs synonyms automatically, so that it finds pages that mention, for example, childcare for the query child care (with a space), or California history for the query ca history. But sometimes Google helps out a little too much and gives you a synonym when you don't really want it. By putting double quotes around a single word, you are telling Google to match that word precisely as you typed it.
  • Search for Keywords with Similar Meaning (~) - Instead of searching for only the given word, using ~ before the keyword you can instruct Google to search for web pages with the exact given word or synonyms of that word. For example, the query TSQL beginner ~tutorial will search for results containing 'TSQL beginner' along with the word 'tutorial' or other words with similar meanings (e.g. guide, manual, reference).
  • Search within a specific website (site:) - Google allows you to specify that your search results must come from a given website. For example, the query ministry site:betenbough.com will return all pages about ministry but only from betenbough.com.
  • Search by file type (filetype:) - Google allows you to search not just for web pages, but also for results contained in specific types of files, such as such as PDFs, PPTs, DOCs, or XLS. For example, filetype:pdf 2012 W4 will return only PDF files as results.

Other Fun Stuff

  • Get the time - To see what time it is anywhere in the world, search time and the city or country. Example: time Nairobi
  • Sports scores and schedules - Get scores and schedules for your favorite NBA, NFL, NHL and MLB teams simply by typing the team or league into the search box. Example: New York Yankees or Texas Tech Basketball or NFL
  • Convert any measurement – Convert units or any measurement (e.g. miles to kilometers, ounces to liters) by typing in the number and unit of measurement. Example: 23.5 kg to pounds or feet in mile
  • Find related pages (related:) - Sometimes it is easier to show Google a page that illustrates what you are looking for than defining what you are looking for in keywords. Use the related: operator to find pages that have similar content by typing related: followed by the website address. For instance, if you find a website you like, try using related:[insert URL] to locate similar websites. Example: related:simplyrecipes.com/recipes/perfect_guacamole/

Other Resources

If this hurts your head, and you need an easier alternative to remember all this stuff ... Google Advanced Search might be a simpler approach that provides most of the advanced functionality described here.

Think you might not be able to remember all this stuff ... or want to go even deeper down the rabbit hole? There is a great Google Advanced Operators Cheat Sheet that can help you quickly remember the operator you need to use, or teach you about others that I didn't mention here.

Shortcut to Google Search

Instead of navigating to Google.com, then typing in your search ... you can just type in your keywords into the browser and hit enter.

If your browser doesn't send you to Google when you do this, but instead sends you to somewhere like Bing, you can change that behavior by setting Google as your default search provider.

Tuesday, December 27, 2011

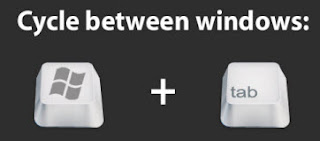
Use Windows+Tab To Quickly Switch Between Windows

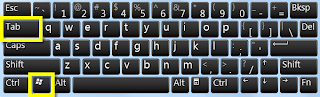
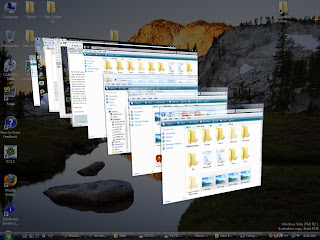
There are a lot of keyboard shortcuts in Windows, but perhaps one of the most useful is using Windows+Tab to switch between different windows you have open. To try it out just hold down the Windows key, then press Tab a few times.

You should see something that looks like the image below. Each time you press Tab (while still holding down the Windows key) it will cycle through to the next window. When you find the one you are looking for, just release all of the keys and it will display the window you selected.

Most people typically have a few programs open at once, and when you sum up the total amount of time we spend navigating between those windows it can add up quick. That is why we have an IT policy to give people a dual monitor setup if they think they would use both of them, and also why I wanted to share this quick tip with you. Try to remember to use it over the next week, and I bet you will be hooked.