Monday, April 23, 2012

How To Use iPhone's Conference Call Feature

Conference calling lets you talk to more than one person at a time. You can merge up to five calls for a phone conference.

  1. Call the first person you want on the conference call.
  2. After they are on the line, tap Add Call and make another call. The first call is put on hold. If you want, you can talk on the second line privately before merging the calls.
    Add Call
  3. Tap Merge Calls. The calls are merged onto one line and everyone can hear each other.
    Merge Calls
  4. Repeat steps two and three to add more calls to the conference.
To Do this
Drop one call from a conference Tap Conference and tap Phone Icon next to a call. Then tap End Call.
Talk privately with a call in a conference Tap Conference and tap Private next to a call. Tap Merge Calls to return the call to the conference.
Add an incoming call to a conference Tap Hold Call + Answer, then tap Merge Calls.

Monday, April 16, 2012

How To Call Forward On iPhone

The iPhone has on-demand call forwarding built-in. This allows you to easily forward all phone calls to another number temporarily, and then turn that back off when you are ready to take calls again.

  1. From the Home screen, tap the Settings icon iPhone Settings Icon
  2. Scroll down and tap Phone
  3. Tap Call Forwarding
  4. Flip the Call Forwarding switch to On, then tap on the Forward To textbox
  5. Use the virtual keypad to enter the number where you want incoming calls to ring
  6. Tap the Call Forwarding button to return to the main Call Forwarding screen

You can tell if call forwarding is enabled by looking for this icon in the status bar.

To turn it call forwarding off just follow the same steps, but in step 4 flip the Call Forwarding switch to Off.

Tuesday, April 10, 2012

TrueHDR iPhone App

Have you taken pictures, only to find out that the beautiful clouds were washed out, making the sky look like a white haze? Or how about outdoor pictures where everything in the shade looked like a dark blob with no details? Have you taken photos of scenes that included lights (indoors or outdoors), only to see that you had to compromise with an overly dark or overly bright final image?

The problem with taking only one photo of a scene that has a large range from bright to dark is that you have to choose whether you want to capture the brighter or the darker areas.

With TrueHDR, you can get the best of bright and dark areas and merge them into a single realistic-looking picture that is much closer to what your eyes originally saw. It essentially takes a couple photos at different exposures and then automatically combines them. The result is a photo with a significantly larger range than the camera is able to capture natively.

Although I haven't switched to using this app exclusively for photos, there are a few scenarios where it can really make a difference:
  • Outdoors when you have bright sunlight & harsh shadows (most of the daytime)
  • Outdoors when you want to see both the sky and a shaded area
  • Indoors when you have to include a light source in the photo

Tips

  • When you open the app, it gives you a few different options for how to take the photo. The Auto Capture mode works great, and I usually just stick to it.
    Capture modes
  • After you take a shot, the app provides some sliders that allows you to easily make adjustments to the merged HDR photos. I typically boost the Contrast and Brightness by 10 or less, but play with the settings to see what looks best for a particular photo. It's easy to go overboard on those settings, so I suggest find what you think looks good and then back off the setting slightly.
    Tweak contrast and brightness sliders

The app costs $2, and some reviews say "TrueHDR is the best two bucks you can invest to improve your iPhone images." It is so good, it was selected by Apple for the App Store Hall of Fame.

Read More or View The App in iTunes

Monday, March 26, 2012

How To Find An Email in Outlook

The Basics

  1. Under Mail Folders, click the folder that you want to search
  2. In the Instant Search box, type your search text (in this example they typed "holiday")
  3. Messages that contain the text that you type appear in the results with search text highlighted
  4. To narrow your search, type more characters or add more criteria (covered in the next section)
  5. To widen your search to include all folders in Mail, at the end of the search results, click Try searching again in All Mail Items

Notes

  • After you have performed a search and located your item in the results list, you can clear the search. Outlook keeps you on the last item you clicked.
  • Attachments are searched but search results from attachments are not highlighted.

Advanced Search

You can narrow your search by adding criteria.

  1. In the Instant Search pane, click Expand the Query Builder
  2. To add more search criteria, type your search text in the From, Body, Subject, or To lines.
  3. To display more search fields in the Query Builder, click Add Criteria, and then select the search fields you want in the list.
  4. Enter your search criteria in the new search fields.
  5. View the search results in the list below the Instant Search pane.

While you enter criteria for the search fields, the Instant Search box displays your criteria as search query syntax. The syntax includes the search criteria followed by a colon, and then the criteria value that you entered, as shown in the illustration below. As you become more familiar with the search query syntax, you can type your query in the Instant Search box instead of using the search fields.

Go Deeper

Monday, March 12, 2012

iPhone Text & Email Tricks

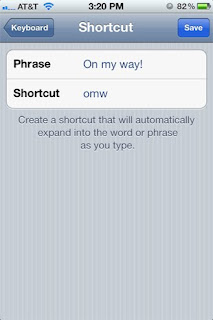
1. Text Expansion

Do you find yourself typing the same thing a million times a day? Go to Settings > General > Keyboard and look for Shortcuts after you scroll down just a bit. Then just enter the phrase and appropriate shortcut, and the next time you type that shortcut the phrase will appear. This is particularly handy for things like BRB or your email address.

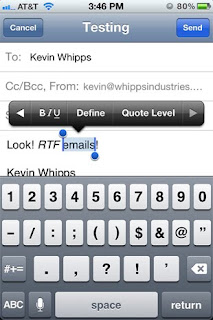
2. RTF Emails

For those that prefer their email fancy, RTF (Rich Text Format) is now available. Just highlight the word or words you want to accentuate per your usual steps, then select the arrow and then the BIU button to pick between bold, italics or underline.

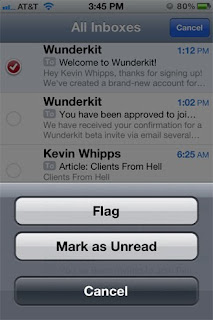
3. Flag An Email or Mark As Unread

If you’re one of those people who flags every email that comes through, make your OCD happy with iOS 5′s new flag an email feature. To do so, go to your Inbox, hit Edit then select the email(s) you want to flag. Select the Mark tag in the bottom right corner and then select Flag, and you’re good to go.


These helpful tips were found in a very well-written blog article by Kevin Wipps. We will be highlighting some of the relevant tips from that post in our "IT's Tip of the Week" over the next couple weeks. Here is a link to that full post: http://iphone.appstorm.net/roundups/developer/40-secret-iphone-features-and-shortcuts/

Monday, March 5, 2012

iPhone Camera & Photo Tricks

1. Use Volume Button As Your Camera Shutter

Taking a picture by holding your iPhone with just one hand is an easy way to get out of focus images. Fix it by holding your iPhone with two hands horizontally, and then push down the + button usually reserved for raising the volume. Now you’ve got a stable picture!

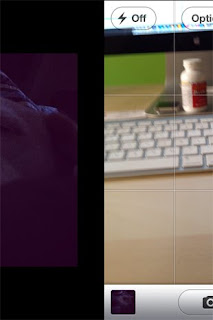
2. Slide To Preview Photo You Just Took

Want to check if that photo you just took is a keeper? Open up the camera app and slide the screen from left to right. It’ll show the last picture taken. This essentially does the same thing as tapping the little preview in the bottom-left. Slide it back to the return to the camera.

3. Camera Shortcut With a Double Tap

Stuck on the lock screen but want to take a picture? Double click the home button and look just to the right of your Unlock slider where you’ll find a little camera icon. Touch it, and away you go to taking pictures.

4. Organize Photos Into Albums

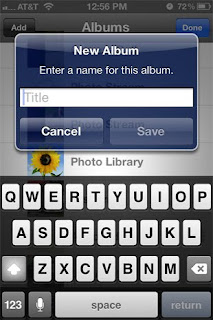
Do you have hundreds of photos in your Camera Roll album? You can now easily organize those photos by creating additional albums. Go to the Photos app, click Edit in the top right corner and then click the Add button that shows up in the upper-left side of the screen. Just enter the title of the new album then you will give you an opportunity to select the photos you want to move there.

These helpful tips were found in a very well-written blog article by Kevin Wipps. We will be highlighting some of the relevant tips from that post in our "IT's Tip of the Week" over the next couple weeks. Here is a link to that full post: http://iphone.appstorm.net/roundups/developer/40-secret-iphone-features-and-shortcuts/

Tuesday, February 28, 2012

How To Use "Find My iPhone" Feature

"Find My iPhone" is one of the new, useful features that came out with iOS v5. If your phone is lost or stolen this will allow you to locate it on a map and remotely lock or erase it.

How to Turn On "Find My iPhone"

  1. From the Home screen, tap the Settings icon.
  2. Scroll down and tap on iCloud
  3. It may prompt you for your Apple ID & password (the same one you need for iTunes). If you don’t remember yours, go here for help.
  4. If it asks you to allow iCloud to Use the Location of Your iPhone, tap Yes.
  5. Scroll down and ensure the Find My iPhone switch is On.

How To Use It To Find Your iPhone

If you want to test it out, or need to actually find your phone:

  1. Go to iCloud.com and sign in with your Apple ID and password. If you don’t remember yours, go here for help.
  2. Click the Find My iPhone icon.
  3. That should open a map, and it will try to locate your phone using its built-in GPS. Within a minute it should show where your phone is on the map like this: