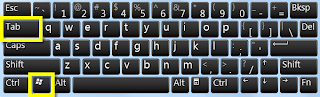
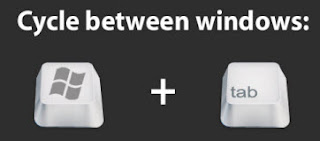
There are a lot of keyboard shortcuts in Windows, but perhaps one of the most useful is using Windows+Tab to switch between different windows you have open. To try it out just hold down the Windows key, then press Tab a few times.
You should see something that looks like the image below. Each time you press Tab (while still holding down the Windows key) it will cycle through to the next window. When you find the one you are looking for, just release all of the keys and it will display the window you selected.
Most people typically have a few programs open at once, and when you sum up the total amount of time we spend navigating between those windows it can add up quick. That is why we have an IT policy to give people a dual monitor setup if they think they would use both of them, and also why I wanted to share this quick tip with you. Try to remember to use it over the next week, and I bet you will be hooked.
We recently upgraded everyone's browser to Internet Explorer v9, and I thought I would quickly run through some of the things that changed in the new version, as well as some of the new features. Some of the most significant improvements are that many of the core pieces that run the web browser have been re-written and are now blazing fast. This means just about everything you do on the web should be at least slightly faster, which should make it worth working through the learning curve and getting use to the new layout and features.
You can watch this short 2 minute video to see what has changed:
Who moved my cheese? Using the new browser controls
The first thing you'll notice when you open Internet Explorer 9 is the simplified design. You can find most command bar functions, like Print or Zoom, when you click the Tools button
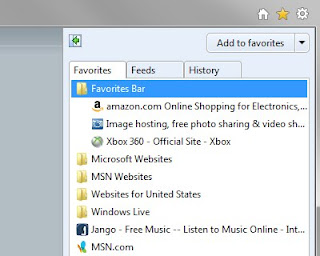
, and your favorites and feeds appear in Favorites Center when you click the Favorites button
.
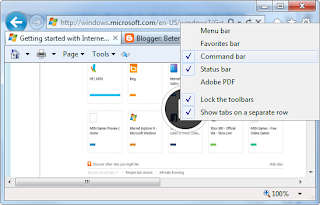
Tabs automatically appear to the right of the Address bar, but you can move them so they appear below the Address bar, as they did in previous versions of Internet Explorer. You can always show the Favorites, Command, Status, and Menu bars by right-clicking the Tools button
, and then selecting them on a menu.
From what we have seen, most people prefer to display the Command Bar and sometimes the Favorites Bar as well.
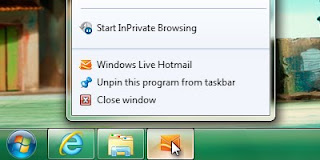
You can access websites that you visit regularly by pinning them to the taskbar on your Windows 7 desktop.
Pinning a site is simple: just drag its tab to the taskbar—the website's icon will stay there until you remove it. When you click the icon later, the website will open in Internet Explorer.
Whenever you open a pinned site, the website icon appears at the top of the browser, so you have easy access to original webpage that you pinned. The Back and Forward buttons change color to match the color of the icon.
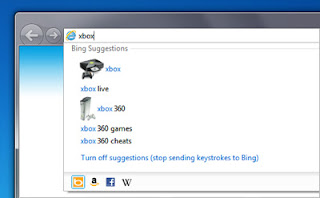
You can now search directly from the Address bar. If you enter a website's address, you'll go directly to the website. If you enter a search term or incomplete address, you'll launch a search using the currently selected search engine. Click the address bar to select your search engine from the listed icons or to add new ones.
When you search from the Address bar, you'll have the option of opening a search results page or the top search result (if your chosen search provider supports the feature). You can also turn on optional search suggestions in the Address bar.
Notifications that don't slow you down ... but aren't obvious either
The new Notification bar that appears at the bottom of Internet Explorer gives you important status information when you need it, but it won't force you to click a series of messages to continue browsing.
While shooting photos or video, tap the screen where you want to focus. When you do this the iPhone will also adjust the exposure and white balance automatically. So with a single tap you can dramatically improve the quality and detail of your picture.
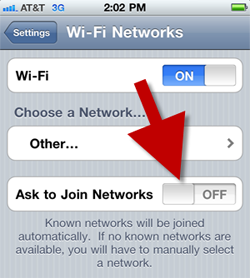
For most people, it doesn't take long after they get a new iPhone to become annoyed by the persistent alerts asking them to join a wireless network that they happened to be near. Here is an example of what that type of alert looks like:
You might be prompted 10 times or more just driving down a city street. Here is how to turn that “feature” off:
Your email's subject line is, next to your name, the first thing the recipient sees. It is important. A good subject should make it easy for your recipient to immediately understand why you've sent them an email and to quickly determine what kind of response or action it requires. Compose a great “Subject:” line that hits the high points or summarizes the thrust of the message. Avoid “Hi,” “One more thing...,” or “FYI,” in favor of typing a short summary of the most important points in the message. A well crafted subject is especially helpful when you have to go back and search for an old email, because they allow you to get a general idea of the content within an email without having to inspect the detials of each one.
So now that we agree email subjects are important, here are some tips on how to create effective subjects.
What Not To Do
Never leave the subject blank
Don’t be vague or general
(Ex: “Hi”, “Phone Call”, “Friday”, “Home Page”, “Tom”, “Did you get it?”)
Don’t try to stuff everything into the subject
(Ex: “Important Information Regarding A Keynote Presentation You Should Attend Dec 1st”)
Don’t try to arouse interest or curiosity to tease someone into opening the email to see what it is really about
(Ex: “Exciting News” or “Special Guest”)
What To Do
A good subject should give the message’s bottom line, similar to the headline for a newspaper article. Here are some tips to help you compose a good subject:
Summarize the message. This might be why you are writing and what you want to be different after the recipient has read your email — instead of describing it.
Be Precise. Include detail that allows the recipient to identify what you are talking about quickly and unambiguously. For example, if you are sending an email to the marketing team, a subject of “Event” or “Ad” is probably not specific enough to be of any benefit to them. Try to put yourself in the recipient’s shoes, and craft a subject that will allow the reader to have a general idea of what the email contains before they open it.
If your message requires the recipient's action, say so; preferably with the first word. The subject of these types of emails should be actionable.
Omit unnecessary words. Email subjects need to be concise. Skip articles, adjectives and adverbs.
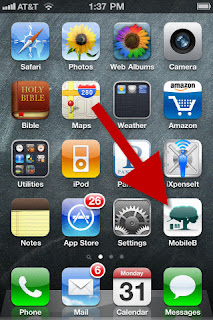
So you know how you have icons for apps on your home screen? Did you know you could add app icons like that for websites too? Then instead of having to open up Safari and type in the URL of the website every time … you just click on the icon on your home screen and it will take you straight there in the browser. This is a pretty minor thing to set up, but it can really be a timesaver if you visit a particular site often (like our mobile site).
Open up Safari and load up the site. Note: In our system, be sure you are signed in and on the actual page you want to bookmark, not our login page. If you bookmark the login page it will always open that page, instead of the site you really want to go to.
Tap on the button that looks like an arrow coming out of a box.
Tap Add to Home Screen
You will now see a preview of what the icon will look like on your home screen for that site, and have the option to customize the text that will appear below it. Tap Add.
That’s it. Now anytime you need to go to that website, just click on the icon instead of going to Safari and manually typing in the URL or trying to find an existing window that is open for that website. This might help save a couple seconds or clicks every time you visit that site.
If you need to print to a certain printer at the office, and you don’t see it in the list of printers you can choose from, here are the steps you can take to setup that an additional printer on your computer.
Click on the Start button , then click Devices and Printers.
Click Add a printer
In the Add Printer wizard, click Add a network, wireless or Bluetooth printer
In the list of available printers, select the one you want to add, and then click Next. (If you don’t recognize the name of the printer you want, contact the IT team for help.)
If prompted, install the printer driver on your computer by clicking Install driver.
The next screen should say you have successfully added the printer to your computer. Click Next to continue.
The next screen will give you the option to set the new printer as your default printer, which means every time you print something it will automatically go to that printer unless you specify otherwise. If you would like to do that, just check the Set as the default printer checkbox. Click the Finish.
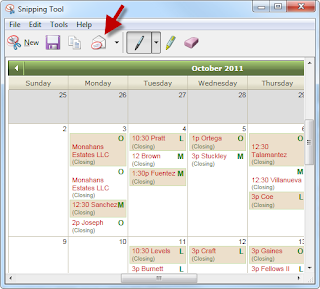
Sometimes the easiest way to save a copy of something is to simply take a snapshot of your screen. Windows 7 has built-in feature called the Snipping Tool, which captures a screen shot of anything on your desktop, like a picture or a section of webpage. Snip a whole window, a rectangular section of the screen, or draw a freehand outline with your mouse. Then you can annotate, save, or e-mail the image using buttons right in the Snipping Tool window.
To Capture & Email a Screenshot
Open Snipping Tool by clicking the Start button , clicking All Programs, clicking Accessories, and then clicking Snipping Tool.
Click the arrow next to the New button, select a snip type from the menu, and then use your mouse to capture a snip.
Once you capture a snip, it will automatically open in Snipping Tool. From there you can click the Send Snip button (looks like an envelope) and it will automatically open a new email that contains the image.
Paying attention to just a few common sense pointers will pay off with a longer battery life for your iPhone.
Tip #1: Keep Out of Heat
The most important thing is to keep your iPhone out of the sun or a hot car (including the glove box). Heat will degrade your battery’s performance the most.
Tip #2: Optimize Your Settings
Depending on how they are configured, a few features may decrease your iPhone battery life. For example, the frequency with which you retrieve email and the number of email accounts you auto-check can both affect battery life.
Minimize use of location services: Applications that actively use location services such as Maps may reduce battery life. To disable location services, go to Settings > General > Location Services or use location services only when needed.
Turn off push notifications: Some applications from the App Store use the Apple Push Notification service to alert you of new data. Applications that extensively rely on push notifications (such as instant messaging applications) may impact battery life. To disable push notifications, go to Settings > Notifications and set Notifications to Off. Note that this does not prevent new data from being received when the application is opened. Also, the Notifications setting will not be visible if you do not have any applications installed that support push notifications.
Fetch new data less frequently: Applications such as Mail can be set to fetch data wirelessly at specific intervals. The more frequently email or other data is fetched, the quicker your battery may drain. To fetch new data manually, from the Home screen choose Settings > Mail, Contacts, Calendars > Fetch New Data and tap Manually. To increase the fetch interval, go to Settings > Mail, Contacts, Calendars > Fetch New Data and tap Hourly. Note that this is a global setting and applies to all applications that do not support push services.
Turn off push mail: If you have a push mail account such as Yahoo! or Microsoft Exchange, turn off push when you don’t need it. Go to Settings > Mail, Contacts, Calendars > Fetch New Data and set Push to Off. Messages sent to your push email accounts will now be received on your phone based on the global Fetch setting rather than as they arrive.
Auto-check fewer email accounts: You can save power by checking fewer email accounts. This can be accomplished by turning off an email account or by deleting it. To turn off an account, go to Settings > Mail, Contacts, Calendars, choose an email account, and set Account to Off. To remove an account, go to Settings > Mail, Contacts, Calendars, choose an email account, and tap Delete Account.
Minimize use of third-party applications: Excessive use of applications such as games that prevent the screen from dimming or shutting off or applications that use location services can reduce battery life.
Turn off Wi-Fi: If you rarely use Wi-Fi, you can turn it off to save power. Go to Settings > Wi-Fi and set Wi-Fi to Off. Note that if you frequently use your iPhone to browse the web, battery life may be improved by using Wi-Fi instead of cellular data networks.
Turn off Bluetooth: If you rarely use a Bluetooth headset or car kit, you can turn off Bluetooth to save power. Go to Settings > General > Bluetooth and set Bluetooth to Off.
Use Airplane Mode in low- or no-coverage areas: Because your iPhone always tries to maintain a connection with the cellular network, it may use more power in low- or no-coverage areas. Turning on Airplane Mode can increase battery life in these situations; however, you will be unable to make or receive calls. To turn on Airplane Mode, go to Settings and set Airplane Mode to On.
Adjust brightness: Dimming the screen is another way to extend battery life. Go to Settings > Brightness and drag the slider to the left to lower the default screen brightness. In addition, turning on Auto-Brightness allows the screen to adjust its brightness based on current lighting conditions. Go to Settings > Brightness and set Auto-Brightness to On.
Turn off EQ: Applying an equalizer setting to song playback on your iPhone can decrease battery life. To turn EQ off, go to Settings > iPod > EQ and tap Off. Note that if you’ve added EQ to songs directly in iTunes, you’ll need to set EQ on iPhone to Flat in order to have the same effect as Off because iPhone keeps your iTunes settings intact. Go to Settings > iPod > EQ and tap Flat.
Turn off 3G: Using 3G cellular networks loads data faster, but may also decrease battery life, especially in areas with limited 3G coverage. To disable 3G, from the Home screen choose Settings > General > Network and set Enable 3G to Off. You will still be able to make and receive calls and access cellular data networks via EDGE or GPRS where available.
Tip #3: Lock Your iPhone
It may seem obvious, but you should lock your iPhone when you aren’t using it. You will be able to receive calls and text messages while it is locked, but nothing happens if you touch the screen. To lock iPhone, press the Sleep/Wake button. You can also set the Auto-Lock interval so your iPhone will turn off more quickly after a period of inactivity. To set Auto-Lock, go to Settings > General > Auto-Lock and set the interval to a short time, such as 1 minute.
Tip #4: Cycle Battery Monthly
For proper maintenance of a lithium-based battery, it’s important to keep the electrons in it moving occasionally. Be sure to go through at least one charge cycle per month (charging the battery to 100% and then completely running it down).
When you change the password that you use to log into our computers, you may notice that your Betenbough email account stops working on your phone. That is because your phone doesn't know your new password, and it is still trying to connect using your old password. To get it working again, you just need to tell your iPhone what your new password is. Here is how to do that:
1. Tap the Settings icon
2. Tap the "Mail, Contacts, Calenders" option
3. Tap the email account "Exchange"
4. Tap "Account"
5. Tap "Password" and delete old password and enter your new updated password (This is the same password that you use to log on into the system)
6. After you entered your new password tap "Done" it is important that you press "Done" or it will not save your new password.
Whenever you open an app on the iPhone, you can hide it by pressing the Home button … but that doesn’t actually close the app. It continues to run in the background, even after you restart the phone. So eventually, you will have almost every app on your phone running in the background which can drain your battery, slow down your device, and potentially increase your data usage.
Here are instructions for how to explicitly close all of the apps running in the background on your phone. Don’t worry; this shouldn’t cause you to lose any information. We recommend you do this once a week.
Double tap the Home button to bring up the multitasking bar at the bottom of the screen. This area will show all of the apps that are running in the background on your phone.
Press and hold anywhere on the multitasking bar until the icons on it start to wiggle.
While they are wiggling, each icon has a symbol above it.
Press the symbol on each app to close it down.
Repeat this until the multitasking bar is empty.
Monday, September 19, 2011
Here are some tips to help you get to the Search Cards and Search Agreements pages even faster.
Instead of going to Cards > Search in the menu, just click on Cards
Instead of going to Sales > Agreements > Search in the menu, just click on Sales
Wireless network connections (also referred to as Wi-Fi) often provides faster data speeds than cellular networks. However, Wi-Fi networks only cover limited areas (usually less than 200 feet from the source). When connected to a wireless network, the iPhone will transfer data over it instead of AT&T’s networks … so you won’t be charged for that data usage, which could save you money on your monthly bill.
Connecting to a wireless network
To see all the wireless networks in range, click the Settings icon
Click on Wi-Fi
Ensure the Wi-Fi setting is turned ON
Tap a network to join it and, if necessary, enter the password. Networks that require a password show a
icon next to them.
When iPhone is connected to a Wi-Fi network, the Wi-Fi icon
in the status bar at the top of the screen shows connection strength. The more bars you see, the stronger the connection.
Your iPhone will automatically connect to wireless networks you have used before when they are within range, and Wi-Fi is turned on.
Many Wi-Fi networks can be used free of charge, and some require a fee (like at some airports, hotels, and coffee shops). To join a Wi-Fi network at a hot spot where charges apply, in most cases you can open Safari to see a webpage that allows you to sign up for service.
Some applications might experience problems when connected over Wi-Fi. If you experience that, you can temporarily disable Wi-Fi.
To do that, just follow steps 1-3, but instead of turning Wi-Fi on ... flip it to OFF.
Statement that you cannot take their call right now
Invitation to leave a message
When they can expect a return call
Who they can contact for immediate assistance (if applicable)
No longer than 20-25 seconds
Avoid giving out too much information and making an overly long greeting
Examples of External Voicemail Greetings
Hi. This is John Smith with Betenbough Homes. Unfortunately I cannot take your call right now. Please leave a message, and I will return your call as soon as I can. Thanks.
Hello. You have reached John Smith at Betenbough Homes. If you would leave me a message, I will give you a call back as soon as possible. If you need immediate assistance, please call (806)797-9494. Thank you for calling.
Hi. This is John Smith with Betenbough Homes. Your call is very important to me, but I can’t answer the phone at this time. If you would leave me a message after the tone, I will return your call as soon as I am able.
Examples of Temporary or "Out of Office" Greetings
Hello. This is John Smith with Betenbough Homes. I will be out of the office until Wednesday, September 3rd. If you need immediate assistance, please call my associate Jane Doe at (806)797-9494. Otherwise, please leave a message and I will return your call when I return. Thank you for calling.
You have reached the voicemail of John Smith with Betenbough Homes. Today is Wednesday, August 31st and I am out of the office. I will be returning tomorrow, September 1st. If you would like to leave a message, I will return your call then. If this is an emergency, please call (806)797-9494. Thank you.
Hi. You have reached the voicemail of John Smith at Betenbough Homes. I am currently out of the office and will return on September 1st. I will be checking my voicemails occasionally throughout the day. So please leave me a message and I will return your call as soon as possible. If you need additional assistance, please call my assistant, Jane Doe, at (806)797-9494. Thanks.
Because we are constantly using our iPhones, we will all inevitably either break it or the software might mess up to the point we need to completely wipe it and start over. It isn’t really a case of if one of these scenarios will happen, as much as when will one happen.
The good news:
If you back up your phone regularly, we can get you a new device and you can just restore your settings, apps, files, etc and be up and running in minutes … like it never happened.
The bad news:
If you don’t back up your phone we can get you a new device, but you will have to set up all your content from scratch and you will likely lose some of your data (see list under What Gets Backed Up section below) … which can be a painful and frustrating process.
The takeaway:
You must proactively back up your iPhone on a regular basis (at least monthly) to avoid the “starting from scratch” scenario and potential data loss.
A few people have been frustrated when we told them we couldn’t recover the stuff from their old phone. Ultimately it is your responsibility to make sure your phone is backed up. Although it would be great if we could recover stuff after something has happened to the phone, in reality it is too late at that point … if you don’t already have a recent backup there is nothing we can do.
Creating a Backup
Decide which computer you want to sync your iPhone with. iTunes can only sync with one computer. A lot of people choose to do this on their home computer, so it can sync with the music they have saved on that computer. You cannot do this from a WYSE terminal. If you primarily use a WYSE terminal you can use a shared workstation (like the one in the conference room), or use your home computer.
Plug your iPhone into the computer (using the USB cable that came with your phone), and open iTunes
After your phone is plugged in, it should automatically start syncing your phone. If you have never connected the iPhone to that computer before it will walk you through a couple of simple steps before it syncs the phone for the first time. Once iTunes starts the sync, it will automatically back up the phone. You should see a status message at the top that says Backing up:
Note: If you have changed the settings so your iPhone doesn’t sync automatically when you plug it in or the Backing up message just never appears, you will need to manually force a back up to run. To do that, right-click on the phone under the Devices section, and choose Back Up. Most people can ignore this step, because it should happen automatically by default.
Restoring from Backup
Plug your iPhone into the computer, and open iTunes.
Right-click on the phone under the Devices section, and choose Restore from Backup…
What Gets Backed Up?
Here is a list of the some of the things stored on your iPhone you could potentially lose if you don't create regular backups:
Photos & Videos
SMS and MMS (pictures and video) messages
Notes
Google Maps bookmarks & recent searches
Safari bookmarks, cookies, history, auto-fill information, and offline data
Email, Calendar, & Contact account configuration (to connect to our Exchange server)
Contact Favorites & Contacts stored locally on the phone
Call history
Apps (including most settings, preferences, and data)
In-app purchases
Home screen layout (how you have organized the apps on different screens)

 , and your favorites and feeds appear in Favorites Center when you click the Favorites button
 .
.


 , then click Devices and Printers.