
Tuesday, July 17, 2012
Add Phrase Shortcuts to iPhone
Create your own personal dictionary, including shortcuts for each word. So your keyboard not only autocorrects, but knows exactly what you want to say as you type. In Settings, tap General, Keyboard, and Add New Shortcut. From here, you can add new phrases and assign optional shortcuts to them.
Monday, July 9, 2012
How To Free Up Space for iCloud Backups
With the latest iPhone update, you now have the option to configure your phone to automatically backup all your apps and data to something called iCloud. Apple includes 5 GB of iCloud storage with the device, but if you have lots of photos or video on your phone … you may have received the dreaded email that looks something like this:
Subject: Your iCloud storage is almost full
As a reminder, iCloud comes with 5 GB of free storage. You are currently using 4.9 GB, which means your iCloud storage is almost full. When your storage is full, device backups to iCloud will stop and apps will no longer be able to save documents to iCloud.
You have a few choices here:
- Ignore the message, and eventually iCloud will stop backing up your phone (WORST OPTION … but likely what most people do. This essentially means you will lose data if something happens to your phone or you switch to a new one.)
- Buy more storage space from Apple ($20/year to double the storage space to 10 GB or $40/year for 20 GB)
- Stay on the free plan, but change your iCloud backup settings to only backup certain stuff
I personally have gone with option #3, and that is likely the best route for the majority of people. I’ll show you how to configure what data is backed up to iCloud, and specifically how to turn off the functionality that syncs photos and videos … which will likely put you well under the 5 GB limit.
-
From the Home screen, tap the Settings icon.

-
Scroll down, and tap iCloud

-
Scroll to the bottom, and tap Storage & Backup

-
Tap Manage Storage

-
Tap on the backup that says This iPhone under the name. If there are backups listed for other devices
you no longer have or you don't know what they are ... you can probably safely delete them to free up some space.

-
This page allows you to configure whether the data tied to individual apps is backed up to iCloud. Just change the switch
to OFF if you don't think it would be tragic if you lost the data related to a specific app.

-
When you change something to not be backed up, you will be prompted with a scary popup like this one. Just click
Turn Off & Delete. Don't worry, it won't delete the data from your phone ... it will just delete it from
the iCloud backup to free up space, and from then on it won't send that data to iCloud.

Note: Anything you switch to OFF will no longer be backed up. That means if you lose your phone, or switch to a new one without manually backing all that stuff up ... you will lose that data. So if you turn off Camera Roll like shown above, you stand the risk of losing your photos and videos. I copy the photos and videos to my computer occasionally, and it is a pretty quick and easy process. To learn how to do that, click the link below:
Apple Support: Importing personal photos and videos from iOS devices to your computerTuesday, July 3, 2012
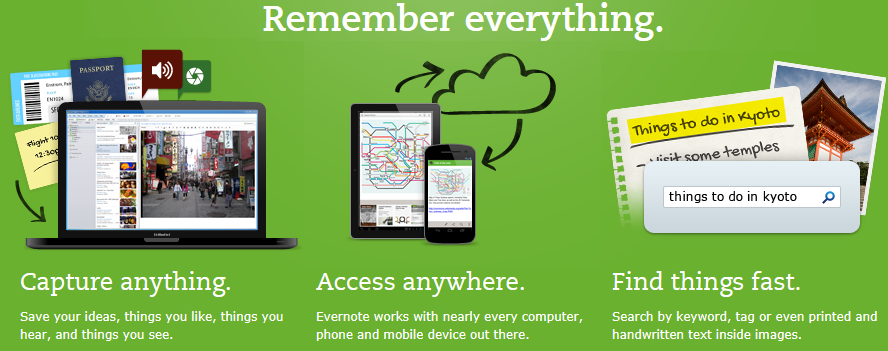
Evernote
Evernote is an app focused on storing your notes and related images, then giving you access to that information from virtually any web-connected devices (desktop, mobile device, browser, etc.). It is a great replacement for the iPhone’s native Notes app, because it contains a lot of additional features and also allows you to review and edit those notes from a desktop if it is more convenient and it always keeps everything in-sync behind the scenes.
For the best experience, install it on both your iPhone and your desktop to make it easy to view and edit your notes wherever you are.
Learn More
-
Watch 50 second intro video
- View Evernote's Getting Start Walkthrough
Tuesday, June 12, 2012
iPhone Group Messaging Tips
After you upgraded your iPhone to iOS4, you may have noticed some strange behavior with text messages. Specifically, you may have sent a text to multiple people, had someone reply to you, and then been told by other recipients that they also got the reply. Or, you may have been the recipient of someone's group text, followed by a reply from another one of the recipients you might not even know. This behavior is due to a feature released with the iOS 4 called Group Messaging. This post will explain what group messaging is, and how you can disable/enable it if you desire.
Group Messaging works under the assumption that you'd like texts sent to multiple people to function like a text message chat room, in which all of the recipients can also chat to each other. Since this behavior might be unexpected, it unfortunately could be the cause of a serious social snafu as well. If you have Group Messaging enabled, when you send a text to multiple people it will send your message along with a list of the other recipients getting the text. If one of your recipients also has Group Messaging enabled, they should be able to see who the recipients were, and when they reply to the group text it will go to everyone.
How Do I Know If I Am About to Reply to All
If you were sent a Group Message, at the top of the window it will say Group MMS. It will also say who else is included in the chat room under that. You can just click the Details link to see the full list. If you don’t have one or more of the people in your contacts, it will just show their phone number instead of their name.

If you want to send a text that all the group will see, just type it out on the Group MMS screen (like the one shown above) and click Send. If you want to reply to just the person who sent the message to you, without the rest of the group being able to read your message you need to go create a new text message and just put that person in the To field. If you reply on the Group MMS window, it will go out to everyone.
How To Disable/Enable Group Messaging
-
From the Home screen, tap the Settings icon.
-
Tap on Messages

-
Switch the Group Messaging setting to Off to disable, or On to enable.

To clarify, the reply-all only happens if both the sender and the receiver/replier of the text message have Group Messaging enabled. The other recipients do not need to have it enabled to receive the reply all.
One more note … I did find several people online who mentioned there seems to be no way to disable Group Messaging for iMessages. Even if you have Group Messaging disabled, it will still send as a Group Message if all of the recipients are iMessage-able.
Monday, May 21, 2012
Business Communication Tips
Call, Email, or Text?
As technology changes, so does how we communicate. We are constantly trying to decide how we should communicate something with a particular person … email, text, phone call, in-person? I wanted to share some tips that most people agree to be good business etiquette regarding communication.| Medium | Reasonable Response Expectation | Appropriate Uses |
|---|---|---|
| Phone | Immediate (synchronous communication) | Important, urgent or complex topics |
| Within 1 business day | Non-urgent items, when the responder may need time to gather info to respond, or if you want a record of the communication | |
| Text | Varies greatly, typically 2 minutes to 2 hours … maybe never (see section below) | Informal topics that aren't urgent or important |
Set Rules for Email-to-Phone Escalation
One Senior VP in a Fortune 500 company recently said that he's established a simple policy with his direct reports that has cut email volume by almost 40%: once a decision generates more than four emails total in a thread, someone needs to pick up the phone to resolve the issue.Text/SMS Message Unreliability
Has anyone ever asked “Did you get that text I sent?” and you didn’t have a clue what they were talking about. Let me explain what might be going on there. Unlike email, SMS message delivery is not guaranteed. Instead SMS messages are delivered by service providers on a “best effort basis.” So when the network is congested most carriers automatically switch to a “store and forward mode”, which places all incoming text messages in a queue and defers their delivery until the network congestion and higher-priority voice traffic subsides. Usually that just means the messages are delayed, but in some cases those queues are never emptied or the messages may not be delivered until long after their relevance has passed. Various studies have shown that 1-5% of messages are lost entirely, even during normal operation conditions.Thursday, May 3, 2012
Severe Weather iPhone Apps
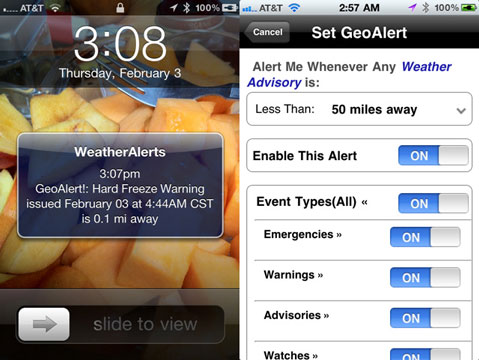
We recently had some severe weather and even reports of tornadoes, and I've heard several people say they weren't even aware that was happening (including me). Someone commented that because we now DVR most the TV we watch, the fact that we rarely watch live TV could be dangerous in those scenarios. Wouldn't it be cool if your iPhone could notify you whenever something like that happened?
Weather Alerts
 View App
Simple, no-nonsense app for quickly notifying you of severe weather alerts in a chosen radius from your current location, including Tornadoes, Hurricanes, Snow Storms, Frost Advisories, Flood/Fire Warnings and hundreds more. Alerts you with sound even when the phone is lying unused with screen off!
One tip on this app … I would configure it not to alert you for a “Wind Advisory”. Those probably come more often than you would like to know about. The cool thing about this app is it is VERY configurable. You can specify exactly what types of events you want it to notify you about.
This app is $4.99, which I know seems like a billion dollars for an iPhone app (how could it possibly be more than 99¢). There are a few other less expensive apps out there like this, but none have near as good of reviews as this one. I won’t get into the technical part of it, but with apps like this there is a large chance that they might drain your battery if they aren’t well written. I haven’t used this for very long, but with all the good reviews I saw I doubt this one has that problem … so I recommend spending the $5 to get it over the other ones.
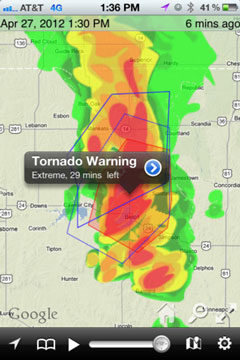
NOAA Hi-Def Radar
 View App
Simple yet powerful app for viewing real-time animated weather radar images in vivid color on a highly responsive interactive map, with higher resolution images than any other radar app. It includes the NOAA warning boxes just like what you would see on the news. You can just click on a box and see the details of the warning it represents.
This app is by far the best one I’ve seen for animated weather radar images. It loads MUCH, MUCH faster, more responsive, and has better imagery. Thanks James for sharing this one.
Monday, April 23, 2012
How To Use iPhone's Conference Call Feature
Conference calling lets you talk to more than one person at a time. You can merge up to five calls for a phone conference.
- Call the first person you want on the conference call.
- After they are on the line, tap Add Call and make another call. The first call is put on hold. If you want, you can talk on the second line privately before merging the calls.

- Tap Merge Calls. The calls are merged onto one line and everyone can hear each other.

- Repeat steps two and three to add more calls to the conference.
| To | Do this |
|---|---|
| Drop one call from a conference | Tap Conference and tap  next to a call. Then tap End Call. next to a call. Then tap End Call. |
| Talk privately with a call in a conference | Tap Conference and tap Private next to a call. Tap Merge Calls to return the call to the conference. |
| Add an incoming call to a conference | Tap Hold Call + Answer, then tap Merge Calls. |
Monday, April 16, 2012
How To Call Forward On iPhone
The iPhone has on-demand call forwarding built-in. This allows you to easily forward all phone calls to another number temporarily, and then turn that back off when you are ready to take calls again.
-
From the Home screen, tap the Settings icon
-
Scroll down and tap Phone

-
Tap Call Forwarding

-
Flip the Call Forwarding switch to On, then tap on the Forward To textbox

-
Use the virtual keypad to enter the number where you want incoming calls to ring

- Tap the Call Forwarding button to return to the main Call Forwarding screen
You can tell if call forwarding is enabled by looking for this icon in the status bar.

To turn it call forwarding off just follow the same steps, but in step 4 flip the Call Forwarding switch to Off.
Tuesday, April 10, 2012
TrueHDR iPhone App
Have you taken pictures, only to find out that the beautiful clouds were washed out, making the sky look like a white haze? Or how about outdoor pictures where everything in the shade looked like a dark blob with no details? Have you taken photos of scenes that included lights (indoors or outdoors), only to see that you had to compromise with an overly dark or overly bright final image?
The problem with taking only one photo of a scene that has a large range from bright to dark is that you have to choose whether you want to capture the brighter or the darker areas.
With TrueHDR, you can get the best of bright and dark areas and merge them into a single realistic-looking picture that is much closer to what your eyes originally saw. It essentially takes a couple photos at different exposures and then automatically combines them. The result is a photo with a significantly larger range than the camera is able to capture natively.
Although I haven't switched to using this app exclusively for photos, there are a few scenarios where it can really make a difference:-
Outdoors when you have bright sunlight & harsh shadows (most of the daytime)

-
Outdoors when you want to see both the sky and a shaded area

-
Indoors when you have to include a light source in the photo

Tips
-
When you open the app, it gives you a few different options for how to take the photo. The Auto Capture mode works great,
and I usually just stick to it.

-
After you take a shot, the app provides some sliders that allows you to easily make adjustments to the merged HDR photos. I typically
boost the Contrast and Brightness by 10 or less, but play with the settings to see what looks best for
a particular photo. It's easy to go overboard on those settings, so I suggest find what you think looks good and then back off the setting slightly.

The app costs $2, and some reviews say "TrueHDR is the best two bucks you can invest to improve your iPhone images." It is so good, it was selected by Apple for the App Store Hall of Fame.
Monday, March 26, 2012
How To Find An Email in Outlook
The Basics

- Under Mail Folders, click the folder that you want to search
- In the Instant Search box, type your search text (in this example they typed "holiday")
- Messages that contain the text that you type appear in the results with search text highlighted
- To narrow your search, type more characters or add more criteria (covered in the next section)
- To widen your search to include all folders in Mail, at the end of the search results, click Try searching again in All Mail Items
Notes
- After you have performed a search and located your item in the results list, you can clear the search. Outlook keeps you on the last item you clicked.
- Attachments are searched but search results from attachments are not highlighted.
Advanced Search
You can narrow your search by adding criteria.
-
In the Instant Search pane, click Expand the Query Builder

-
To add more search criteria, type your search text in the From, Body, Subject, or To lines.

- To display more search fields in the Query Builder, click Add Criteria, and then select the search fields you want in the list.
- Enter your search criteria in the new search fields.
- View the search results in the list below the Instant Search pane.
While you enter criteria for the search fields, the Instant Search box displays your criteria as search query syntax. The syntax includes the search criteria followed by a colon, and then the criteria value that you entered, as shown in the illustration below. As you become more familiar with the search query syntax, you can type your query in the Instant Search box instead of using the search fields.

Go Deeper
Monday, March 12, 2012
iPhone Text & Email Tricks
1. Text Expansion
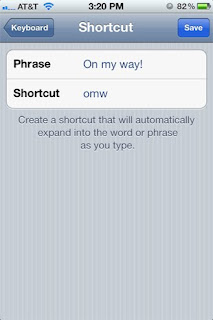
Do you find yourself typing the same thing a million times a day? Go to Settings > General > Keyboard and look for Shortcuts after you scroll down just a bit. Then just enter the phrase and appropriate shortcut, and the next time you type that shortcut the phrase will appear. This is particularly handy for things like BRB or your email address.
2. RTF Emails
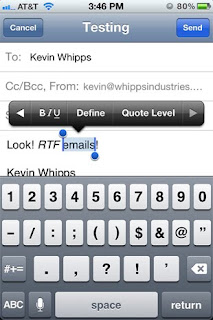
For those that prefer their email fancy, RTF (Rich Text Format) is now available. Just highlight the word or words you want to accentuate per your usual steps, then select the arrow and then the BIU button to pick between bold, italics or underline.
3. Flag An Email or Mark As Unread
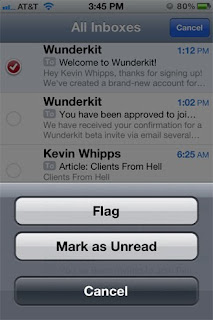
If you’re one of those people who flags every email that comes through, make your OCD happy with iOS 5′s new flag an email feature. To do so, go to your Inbox, hit Edit then select the email(s) you want to flag. Select the Mark tag in the bottom right corner and then select Flag, and you’re good to go.
These helpful tips were found in a very well-written blog article by Kevin Wipps. We will be highlighting some of the relevant tips from that post in our "IT's Tip of the Week" over the next couple weeks. Here is a link to that full post: http://iphone.appstorm.net/roundups/developer/40-secret-iphone-features-and-shortcuts/
Monday, March 5, 2012
iPhone Camera & Photo Tricks
1. Use Volume Button As Your Camera Shutter

2. Slide To Preview Photo You Just Took

3. Camera Shortcut With a Double Tap

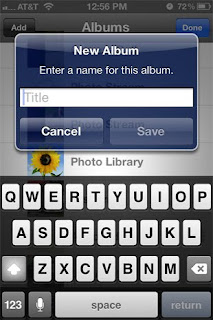
4. Organize Photos Into Albums
These helpful tips were found in a very well-written blog article by Kevin Wipps. We will be highlighting some of the relevant tips from that post in our "IT's Tip of the Week" over the next couple weeks. Here is a link to that full post: http://iphone.appstorm.net/roundups/developer/40-secret-iphone-features-and-shortcuts/
Tuesday, February 28, 2012
How To Use "Find My iPhone" Feature
"Find My iPhone" is one of the new, useful features that came out with iOS v5. If your phone is lost or stolen this will allow you to locate it on a map and remotely lock or erase it.
How to Turn On "Find My iPhone"
-
From the Home screen, tap the Settings icon.
-
Scroll down and tap on iCloud

- It may prompt you for your Apple ID & password (the same one you need for iTunes). If you don’t remember yours, go here for help.
-
If it asks you to allow iCloud to Use the Location of Your iPhone, tap Yes.

-
Scroll down and ensure the Find My iPhone switch is On.

How To Use It To Find Your iPhone
If you want to test it out, or need to actually find your phone:
- Go to iCloud.com and sign in with your Apple ID and password. If you don’t remember yours, go here for help.
-
Click the Find My iPhone icon.

-
That should open a map, and it will try to locate your phone using its built-in GPS. Within a minute it should show where your phone is on the map like this:

Subscribe to:
Comments (Atom)